For a long while now, 2wdMod.com has been focused on doing mainly race reports and race coverage. I’ve been lucky enough (and blessed) to travel around stateside as well as internationally to do race coverage, in which I’ve had the honor in witnessing some of the best racing our industry has to offer. It has been truly wicked! Because I love nerding out to all these race cars, I’ve decided to take my photography, knowledge and experience to do some in-depth reviews of the latest 2wd kits. The reviews will consist of 3 parts, The Build, The Shakedown, and The Race. Through these 3 steps, hopefully there’s a bit of knowledge and goodness that gets passed around so the community can grow, enjoy, and share their experiences with these fantastic cars.
My first 2wd for review comes all the way from the far east. With a long, established racing history that goes way back to the late 70’s, Yokomo is a company that has produced World Championship winning cars for decades with a total of 14 WC titles. With this heritage, the company has ventured into the new era of astro/carpet tracks releasing a dedicated high grip slayer…. the YZ-2!

The Build
Without a doubt, car manufacturers have taken a lot of tips and cues from one another and the YZ-2 is no different. There’s only so many ways to build a shock. Unless we move away from the conventional piston/oil/o-ring design, they’re all going to incorporate the same ideas and the difference is going to come down to the build quality and material quality.
Inside the box, the parts are all bagged together in groups which makes it a lot easier and saves time from opening multiple packages to get 1 part done. The instruction manual is quite simple, but simply works. It’s not a printed magazine by any means, but more like an office print job in black and white. Fortunately, I had no issues with the manual as everything was well documented and the instructions were good. Don’t judge a book by it’s cover! 2 wings, a body, yellow wheels, and a bunch of parts in bags and let me see……… time to build!

The chassis – This thing is beautiful. It’s simple, well designed and well crafted. The machine work is stunning and feels like a nice quality piece. The anodized color is dark, like a gunmetal and that’s a bonus. Yokomo has decided to raise the sides to add rigidity, but still machining out the battery area to retain a flat mounted battery. Another design feature Yokomo has gone with is to produce a 1 piece chassis, thus requiring kick-up also incorporated into the chassis while some manufacturers have gone with a 2 piece design with a front nose clip.

So the first step is to attach the side plates and rear body mount posts to the chassis. The side plates have a good deal of stiffness to them to where I would think they add stiffness to the chassis if all the mounting screws were in. Take screws out would obviously increase flex which is a great tuning option.

Next up is the 6 10mm screws used to attach the bulkhead mounts. These little guys are also intended to help aid in front-end rigidity as it also holds the upper front bulkhead. Add in the front aluminum suspension mount with bellcrank posts and we’re onto the steering bellcranks.
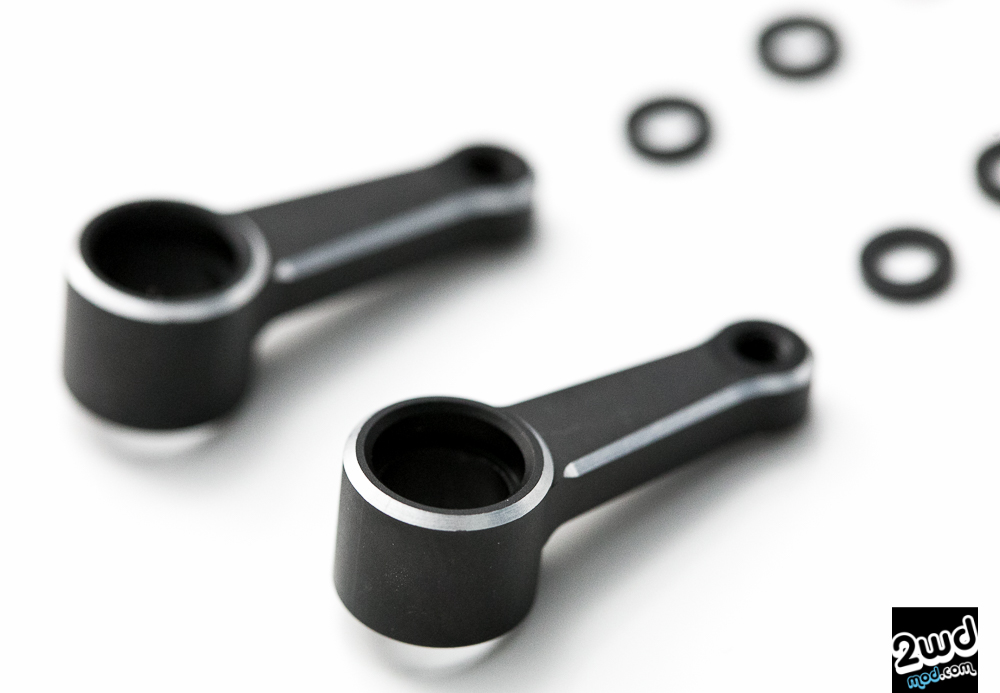

Yokomo’s YZ-2 steering system is the best I’ve seen to date… period! The black anodized, machined trim all aluminum steering assembly is basically RC porn on steroids. Add in 8 ball bearings and you’ve just hit the mother load and I can pretty much see your O-face. I can lock the screws that hold the Ackerman bar to the bell cranks and the system is still butter smooth. What else? No play! I mean, this thing is dialed. It’s not totally zero play because you’re always gonna have a little play in bearings etc, but this is the tightest rack I’ve used by far! Is all aluminum good? Well, that depends on how much you crash, but for high bite and for a highly skilled driver, it definitely has its benefits.
Yokomo also took the inverted bellcrank design and took it another step further by adding bearings that are tightly squeezed into place. This inverted design helps move the servo farther forward allowing for more room for electronics and you’re going to need it in this laydown design.

After completing the steering system, on goes the aluminum front suspension mount, aluminum upper camber mount, and front bulkhead. I noticed after screwing down the bulkhead, the bellcranks have a little play so I added a .2mm axle shim on top of the bellcranks and it was tight and super smooth and free once the bulkhead was screwed back into place. Keep in mind your mileage may vary.

Now the manual turns and focuses on the rear end of the car starting with the rear-front suspension block… which are also that sweet black, machined trimmed aluminum goodness. I put the suspension spacer in as the manual says, but it looks like the latest trend is to remove the front and rear spacers and run the blocks bare to the chassis. I’ll try them in first and then remove then in THE SHAKEDOWN portion of the see how it feels.
The next step is tricky. The suspension bushings are quite confusing at first glance as the info, table, and markings are all relatively new to me. There’s 20 bushings and you’re only going to use 4 at a time. Pay close attention to the bushings and orientation to get the right toe-in and anti-squat settings. The instructions have a dotted line circling the correct bushings. The system looks like it was designed around the front bushings as you can run the arrows up or down changing roll center to HRC or LRC. Coupled with the suspension shims provided, you have a lot of different combinations for roll centers and anti-squat positions. You could get all crazy and experimental and use the rear bushings in the front AND the rear to get even more dialed… or confused as that chart does not exist. I’m going to keep it simple and stick to the chart in the manual. After assembling the rear end to the chassis, I added .2mm hinge pin shims to tighten up the rear arms to my OCD levels. Again, your mileage may vary. Now, there’s just a bit of wiggle and I can move onto the next step.
You could get all crazy and experimental and use the rear bushings in the front AND the rear to get even more dialed… or confused as that chart does not exist. I’m going to keep it simple and stick to the chart in the manual. After assembling the rear end to the chassis and noticed some play, I added .2mm hinge pin shims to tighten up the rear arms to my OCD levels. Again, your mileage may vary. Now, there’s just a bit of wiggle and I can move onto the next step.

Here’s our first glimpse at carbon fiber for the YZ-2. Compact, stiff, and lightweight, these 4mm towers mean business. The instruction manual didn’t state to glue and sand the towers, but I’m sure doing that wouldn’t hurt the process as it would stiffen them further and the smooth edges would keep it from catching and potentially splitting or breaking. I’ll probably glue and sand them before I run, but for the build review it wasn’t necessary.

Now, just prep the towers and get ready for mounting by attaching the shock screws, nuts, and standoff. For the rear tower, add the wing mounts and set it aside. Next, attach the front tower to the bulkhead and now let’s focus on the transmission, which is what makes this car unique as the transmission is a low CG design and often referred to as the ‘laydown’ tranny.

The kit comes with a pre-built gear diff (thank you). After opening it and knowing what surface I’m going to be running on, I decided to fill my diff with 5k to start with, rather than the kit packaged 3k. Depending on your surface and tires at your local track, 2k, 3k, 5k or 7k might be a good starting point for your needs. The gear diff felt sturdy and robust. It looks like a step above other companies’ gear diffs that I’ve experienced as most of them have adapted an RTR gear diff to be used. I’m anxious to see how Yokomo’s gear diff holds up after a few fluid changes and packs. Time will tell.
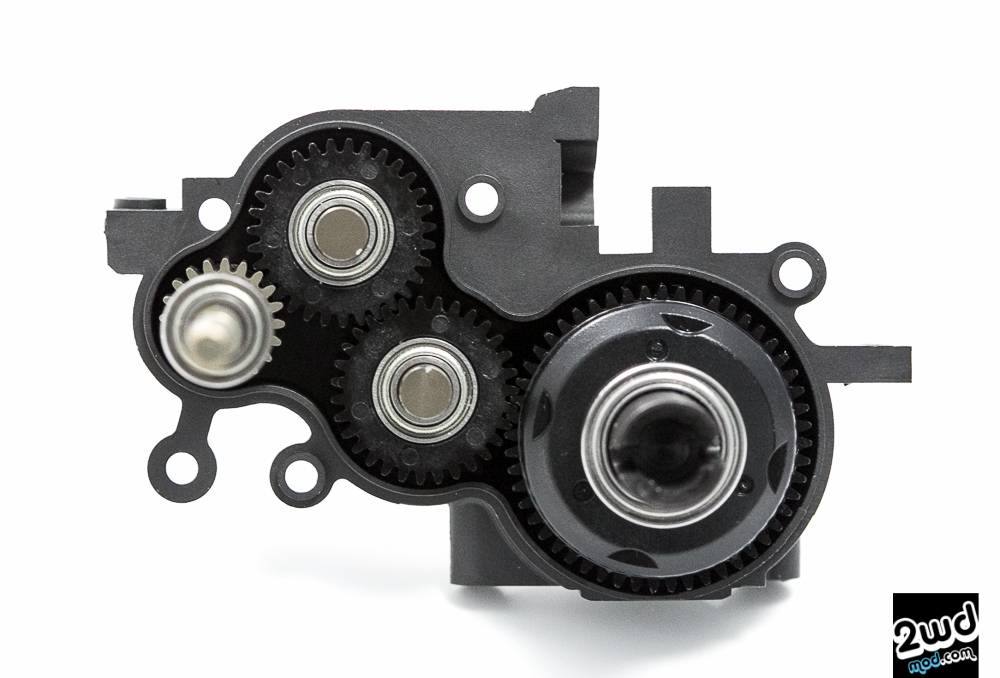
The Yokomo laydown transmission is a 2.6:1 ratio 4 gear tranny. It uses two larger 31 tooth plastic idler gears that was designed to handle the high grip power levels better than the traditional 25/26 tooth idlers. With bigger gears, tooth engagement is increased as well as by having more teeth, each tooth will have less contact per revolution that should amount to increased longevity. So far, there’s no aluminum idler gear upgrade as of yet, but Yokomo does have carbon idler shafts that is carried over from the Bmax 2 kit.
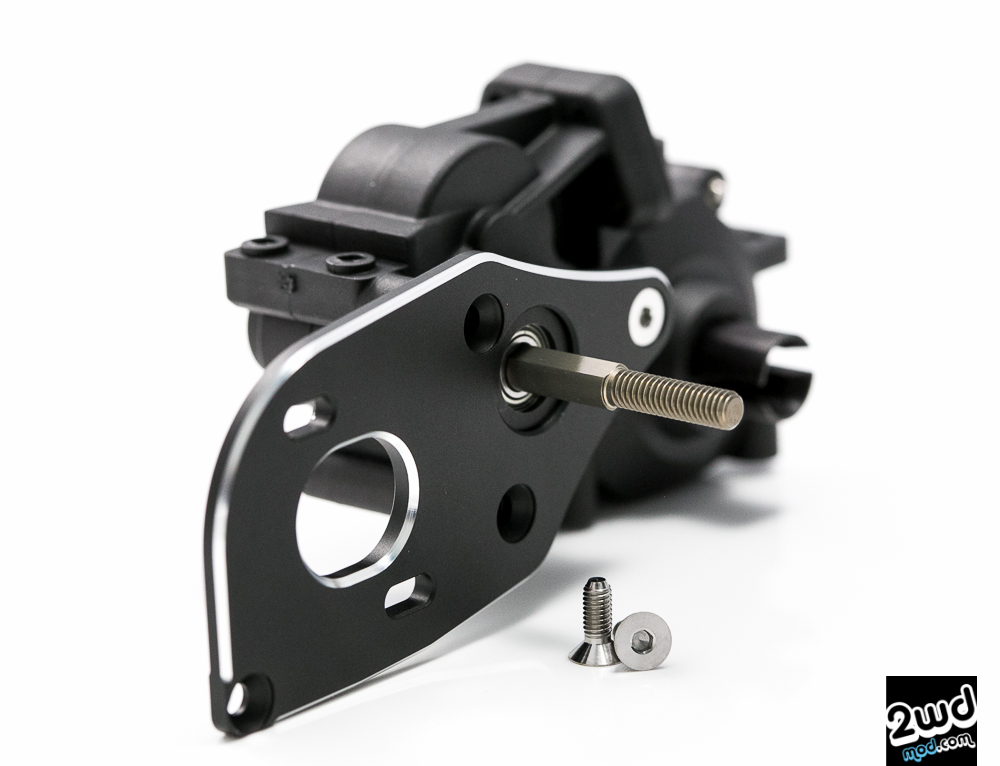
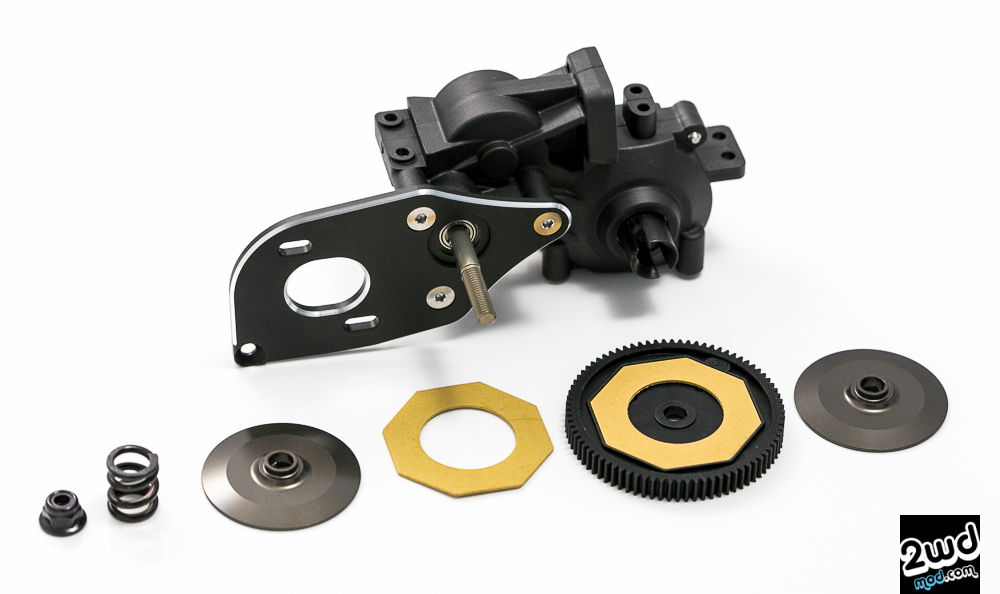
One of the unique design elements to the YZ-2 is the transmission case. It actually uses separate screws to mount the 3mm thick aluminum motor plate to the tranny case instead of the traditional screws that are super long and clamp the tranny case to the motor plate. As you can see from the pic above, 3 screws bolt the motor plate to the transmission case which leaves 5 screws designed specifically to close the housing together. As a result, no internal screw is needed to hold half the case to the motor plate!
The results are impressive as I could reef the screws down without really affecting how the transmission spins! The case is tight, the motor plate is tight, and the tranny spins effortlessly smooth. This is a first as you could never really tighten the tranny screws as it would start to bind the rotation of the transmission. Then you’re left with a loose motor plate that’s barely hanging on. Add a 6.5 or 7.5 and you can only guess the amount of flex produced from just the motor plate alone. Then go jump it off a 30 foot triple and see what happens.
After building the transmission, next up is the slipper assembly. This is your traditional slipper unit with AE style slipper pads. No spacer or shim is needed so you don’t need to worry about dropping your brass on the floor everytime you take your slipper off. Easy, simple, and proven. There’s also an option for a 3 pad assembly and/or ventilated slipper plate for even more consistent performance.
Now it’s time to bolt the transmission to the chassis, but before we do this check out the 3 piece rubber pads set that is included in the kit. I believe the idea is to make a ‘floating’ transmission set and take away some of the vibration to add smoothness to the car. As of now, I installed the rubber pad set, but I’m not sure if it’s going stay. The flex and dampening might be a good or bad thing and the only way to find out is to run it both ways and see.

Now mount the rear tower and rear camber link to the transmission case and drop in that transmission! I installed the motor plate support bar for now, but it looks like most guys aren’t running this option. Add in the waterfall, battery holder posts, and foam pads and we’re one step closer in completing this 2wd.

As you can see, the tower bolts straight to the transmission case. So in order to get to the gear diff, there’s 19 screws you unscrew before you can open the case and remove the diff. 4 top side, 4 bottom side, 4 tower screws, and 5 tranny screws…. yikes! Perhaps we will see an updated gearbox in future releases of the YZ-2 as there’s better ways to improve the gear box design for example Xray and Durango.

Moving back to the front end, Yokomo uses plastic carriers and spindles that incorporates a carbon fiber elbow. Also, Yokomo has updated to front hexes to a 4.3mm wide hex. The previous design was much like the TLR 22 with a screw-in front axle rather than an M4 nut. As I look around for setup sheets, some drivers are using the optional 5mm front hex to gain a bit more stability. I also had a few 1mm solid pins (as in the picture above) laying around so instead of using the push pins, I just inserted the solid pin and built my front axles up like standard. Upon doing so, I noticed there was a little play left in the bearing/spindle/axle combination so I shimmed it with 2 x .3mm shims on the screw side and that took away most of the play. You could play with shimming on the hex side and widen the front track without having to buy the option 5mm hexes. Always good to have options!

The caster block design is the popular kingpin style design with 2 screws, one from top and one on bottom that hold the spindle in place. These also use bushings that have offset spacing in order to change the spindle height to up or down depending on your tuning needs. This design has been seen on a lot of different cars as of late including, Durango, Serpent, AE, Xray, etc. Once again, I found a little gap after screwing down the king pin screws so I fitted my spindle with an extra .5mm shim on the bottom side of the spindle which took away a lot of the extra play.
Also, the caster blocks come with 3 inserts that can be used in up or down position to add or take away caster. The options are 0 degrees, -2.5, -5, +2.5, +5 degrees…. I mounted zero for now.
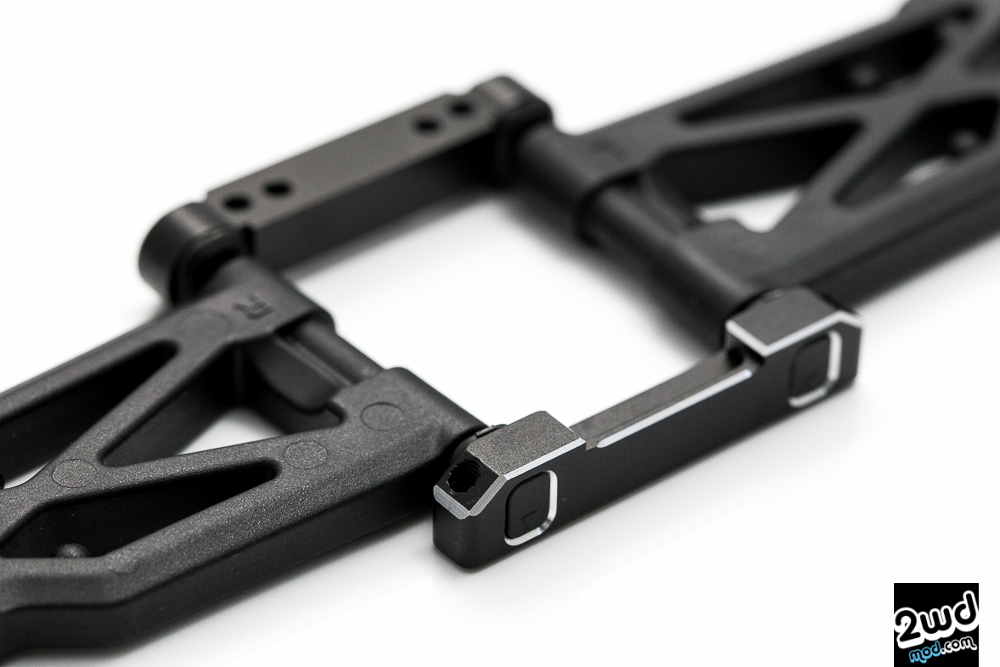
Now that the steering blocks are assembled, it’s time to add some arms and begin mounting them to the suspension mount. If you notice here, Yokomo uses different size outer and inner suspension hinge pins. The inner is thicker at 3mm while the outer pin is smaller with a 2.5mm diameter. I’m not sure if this is a good or bad thing as of yet. If I bend a lot of outer hinge and durability is compromised then I know my answer. As of now, weight is saved and look forward to testing its durability. Next, don’t forget to add the caster block spacer. These are a little different than the black aluminum 1mm spacers we’ve been using as they’re actually a little bit bigger.

Add the bumper, hinge pin brace and you’ve got a front end minus shocks and turnbuckles! Finally, back to the rear of the car to build the hub carriers and we’re almost done!

Here’s the hub carrier set. This one has 6 holes on top and is very much like the TLR 22 style plastic hub that even other companies have started to mimic. The hubs consist of larger outside 5×13 metal shielded bearing and 5x10mm metal shielded bearing for the inner sandwiching a crush tube. Sliding over to the axle side, the system uses a 4.5mm spacer with a solid 1mm solid axle pin and a 6mm hex. The cool part about this system there is no need for those tiny axle shims. The slack is all taken out when you compress and tighten the hex to the axle. A simple yet effective way of getting rid of shims so there is none to lose when doing maintenance work on the hubs or CVAs. Attach the hubs to the rear arms with the hub spacers. Again these spacers are different from the 1mm black aluminum spacers. The skinny hinge pin makes another appearance once again.
Also noting, the Yokomo CVA bone itself is very short combined with a long axle and a 4.5mm spacer and 6mm wheel hex. Again, I’m not sure of the results until I start running the car and figuring out what the rear end needs, but it does look like a majority of YZ-2 owners have shifted to the wider B4-008R rear arms and longer B2-010RB bone to match. I’ll have to get the parts and try this later in THE SHAKEDOWN portion of this review. Last thing, don’t forget to grease the CVA joints and bone end for longer lasting and smoother operation.

Out with the steel turnbuckles and in with the best from Lunsford Racing. Using grade 5 titanium, Lunsford’s titanium products are legendary in the world of RC and can be found on almost ALL of the top pro’s cars. Not only is the titanium lighter and stronger than the steel, it also looks fantastic. You also can’t beat the fact that it’s all made here in the U.S.A. and backed with Lunsford’s titanium turnbuckle guarantee. If it bends or breaks, ship it to the shop and it will get replaced. I’m a huge Kelly Lunsford fan as he’s one of the best RC ambassadors in the business and wonderful individual straight through to the core.
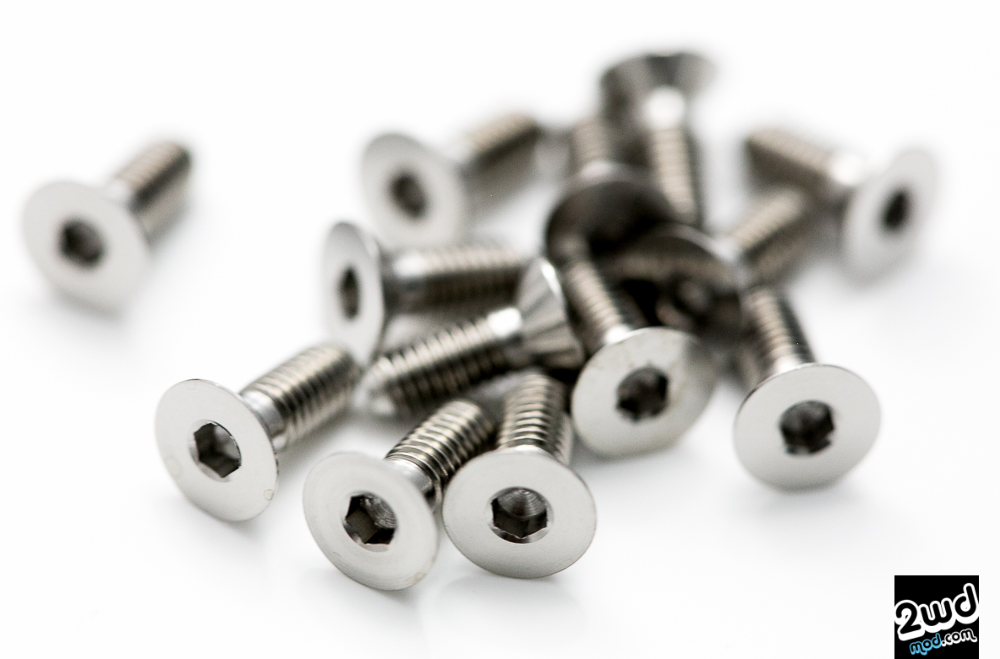
Also on my YZ-2 build, I am using Lunsford‘s new YZ-2 titanium screw kit and ball stud set. The stock Yokomo ball studs are metric in thread, but have the old school size 4.3mm head and 2.5mm neck. Lunsford titanium ball studs uses a 4.8mm head and 2.6mm neck. I’m not sure why Yokomo would go with the smaller ball studs, perhaps because they already had them or maybe because they’re super smooth b/c of less surface area contact? Who knows, but with the bigger, beefier Lunsford ball studs, you have to use a ball cup that fits and Lunsford also provides excellent ball cups in conjunction with their ball studs. Best in the business! **Use good tools when using titanium screws. It will add a lot of longevity to the life of the screws.

Finally, the YZ-2 is almost complete. The last major part of the build is the shocks, which Yokomo dubbed as the X33 shocks because of it’s larger 3.3mm shock shafts that are a step up from the conventional 3mm shafts…. yet smaller than 3.5mm of TLR’s design. The hard-coated, anodized 12mm big bore shocks look fantastic. Taking cues from TLR, AE, etc the Yokomo shocks load from the bottom and fill from the top with a plastic shock cap and bleeder screw. The kit comes with clear x-rings which is an added bonus for silky smooth operation. Gone are the days of the grey shock bodies and blue accents of the Bmax 2 kits and good riddance. These shocks look 1000 times better and work fabulously (on the bench so far). Yah the caps are plastic, but if they don’t break in a hard crash, I’m okay with that. Yokomo does have aluminum shock caps, but they’re not black and they don’t look as cool ……… maybe later.

The kit springs are YS-A875 yellow marked front springs and YS-A1200 green springs on the rear. Note, these ARE NOT the Yatabe carpet/astro springs. Those are sold separately and I am going to assume these springs are going to be pretty soft for astro and carpet racing? More to look forward to in the shakedown as I will be testing Kyosho and Yatabe springs to see which manages to stay on the YZ-2. Overall, the shocks are smooth, easy to build, and come with clear x-rings. Oh and I would not recommend using the stock kit pistons. They’re molded and horrible. Go for a machined Avid, Schelle, AE 12mm piston and you’ll have a lot better results. Kyosho pistons work well too, but keep in mind you might have to change the shim that slides on before the piston to get the e-clip to slide on properly.
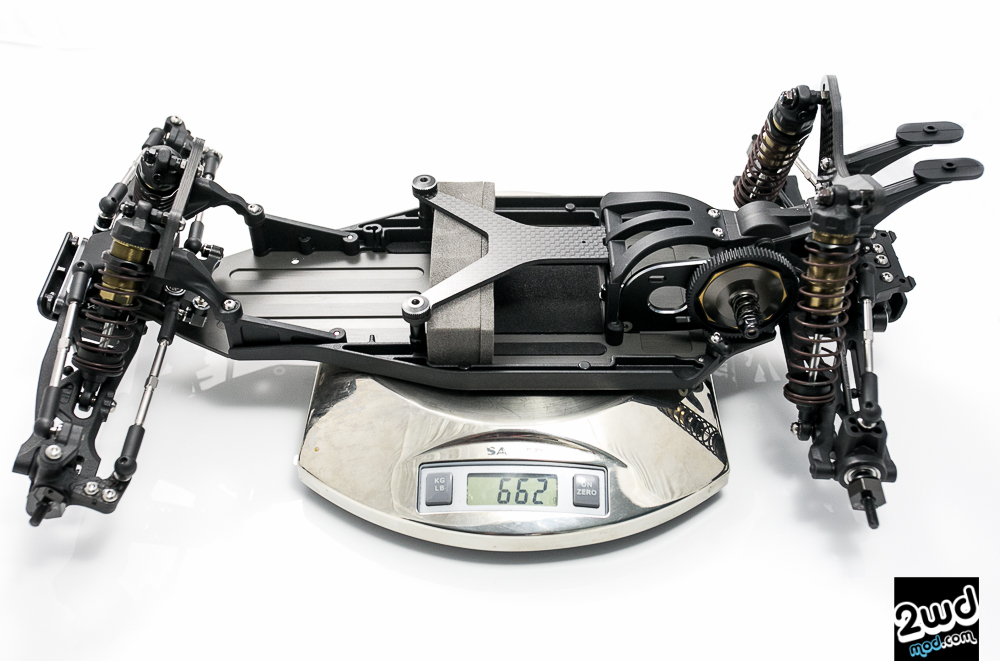
So finally, a built car ready for electronics install. I actually built the kit first with stock steel screws, steel turnbuckles, and stock ball studs and ball cups. Weighing it in the same configuration as in the picture above, the YZ-2 weighed 690 grams completely stock. As you can see, the identical car with the Lunsford titanium upgrades, the weight is now down to 662 grams!
Now I just need to install the ESC, wire it, and add my receiver and transponder and I’m set.
Conclusion
The Goods
Building the YZ-2 was like building a dream car. For the price of $349 USD, not on sale, is quite a bargain for what you’re getting. On sale, it’s a deal hard to beat and it’s all the little stuff that make this kit special. The design is the 1st for a production kit with a low CG laydown transmission pushing the weight bias drastically towards the middle of the car resulting in better performance on higher grip surfaces. Yokomo is leading the way with this revolutionary design with this mid-motor platform and all the companies have started follow suit and implement these ideas into their own designs. Absolutely cutting edge.
A small, but an important positive is how the kit is bagged in a way that makes sense. It was really easy to locate all the parts and moving from one step to the next was very intuitional.
One of my favorite thing I loved about this car is the dialed steering rack. The design, look, and execution is the best I’ve seen yet on any 2wd I’ve seen to date. Going all aluminum may kill a few servo gears or break a few plastic servo horns, but I’ll have to learn to crash less as they don’t make plastic steering parts! Dialed!
Speaking of which, all of the aluminum goodies are well crafted and beautifully designed. The elegance of black and silver look stunning to the eye and the part fitment is stellar. Here’s the list of aluminum parts you get for the price of $349…
- Aluminum front suspension mount
- Aluminum front camber block
- Aluminum RF suspension block
- Aluminum RR suspension block
- Aluminum bell cranks
- Aluminum Ackerman bar
Add in the fact you also get…..
- Carbon fiber 4mm front shock tower
- Carbon fiber 4mm rear shock tower
- Carbon fiber battery brace/hold down
- Metal shielded bearings throughout plus 8 bb’s in the rack
Putting the kit together was a blast. It went together easy and shimming was down to a tolerable level with only a few areas needing to be shimmed. The transmission is stellar, the case is tight as can be and the thing spins freely and effortlessly. The gear diff looks to be quality and looking forward to putting a bunch of packs on the car.
The shocks look fantastic and feel butter smooth. There’s very little shaft wobble so the internals are nice and tight. They’re easy to build and bleed, just make sure you get the bubbles out or you’ll have top off and bleed again later. For more adjustability and dial-ability, the rear shocks can go on the backside of the arms to give more weight bias over the rear end via adding in a small plastic spacer for the tower, flip the shocks to the backside of the a-arms and you’re good. A fantastic tuning options for medium bite tracks.
Yokomo is dedicated to racing and will constantly improve the performance of the car and gives you awesome upgrades and options like gullwing front arms and matching tower, diamond coated shock shafts, ventilated slipper plate, triple slipper pad option, steel suspension mounts, graphite plastics, aluminum rear camber link, hubs, caster blocks, and the list goes on and on.
Overall I felt the YZ-2 was an excellent kit with great value, superb quality, and killer aesthetics. If looks could kill this would be the kit and basically what I mean is if you lined up all the 2wd drives in a row and asked me which one I’d pick based purely on looks alone, the YZ-2 would win it for me hands down. It just looks killler! As a whole, the build was exceptional and I was really pleased to piece this kit together. As it was nearing completion the smile and anticipation kept getting bigger and bigger. Stoke-ness level to the max!
The not so good:
There’s not a lot to dislike about the YZ-2 (during the build process) so I’ll have to nit pick a little here, but I think there are concerns others might have as well. First off, the plastic seems very soft. When I move the caster blocks and spindle, there’s a lot of flex going on. Flex is sometimes good and sometimes bad, but on a car dedicated to high grip I’d like to think that the harder plastics is going to yield better performance. Now with that said, harder plastics are also known to be more brittle so perhaps Yokomo was thinking ahead for the ‘general’ consumer packaging the kit with the softer arms, hubs, caster, and spindles. Fortunately, Yokomo does have what they call ‘graphite’ plastics that is infused with carbon composite fibers for added stiffness and rigidity. They also have aluminum rear hubs and front caster blocks for ultimate stiffness and durability.
But say you wanted to run your YZ-2 on dirt clay, the softer plastics will probably be a bit easier to drive so I’ll let it slide since this part of the review is focused on the build quality and experience and not performance. With that in mind, the soft plastics keep turning and turning when you screw into them. Take a break, come back to that screw and it will always tighten down some more. Luckily for me, I didn’t strip a screw hole yet (knocking on wood), but be careful!
2nd thing I thought that was not so good, which I believe is just inherent to the lay-down transmission design is that you barely have space for your electronics. It’s a tight fit! If you choose to run a full-size servo rather than the popular shorty servo, you might want to make sure you have room for your electronics otherwise you’re going to have to buy a shorty servo if you don’t already have one. I’m having to stack my capacitor, switch, and transponder on top of my full size servo, which is a first for me. If it fits I won’t care one bit, but if it doesn’t and have to place stuff on the battery brace…. mega sad face!
Oh and yeah those 19 screws to get to the diff is kind of ‘hurting’. Then again, the World Championship winning B5M was designed the same along with Kyosho’s laydown prototype RB6, which I’ve gotten to drive, wrench on, and race for about a month here in the states. But really, it probably only adds 5 – 10 minutes of extra wrenching time so to me it’s not a make it or break it deal.
The last thing is just a minor gripe and that’s the 4 Phillips screws that hold in the outer hinge pins. Yah really… Phillips screws! Thinking I could replace these with some Kyosho or AE hinge pin screws, nope! Come to find out they’re even smaller and going to be hard to find? I’ll have to dig around so I can keep everything on hex screws.
Other than that, the kit is dialed and I can’t wait to drive it. Thanks for stopping by and I hope you check out THE SHAKEDOWN as I’ll spend a day at the track tuning and running some option parts to learn more about how the car handles and performs on a typical test day. FINALLY I GET TO DRIVE IT! After I install electronics of course.
